X4/X5 Sanitiser Station Install & Operation Manual
Introduction
Models
The X4/X5 model is a free standing hand sanitiser station. It is a self-contained machine with a robust stainless
steel frame cabinet and an attractive acrylic front.
This hand sanitiser unit is manufactured to the highest standards and has been designed to meet all the latest
relevant safety specifications. Please read and understand these instructions before starting work. Please leave
these instructions with the user following installation. Particular attention should be paid to the section headed
installation.
The hand sanitising station must not be sited outside or in any location where it could be exposed to the
weather. It must be installed in a dry environment.
In the Box – X4
- – X4 Unit
- – Base with fixing screws
- – 4 x Adjustable Feet
- – 1 x Hand Sanitiser Container
- – 4 x C Type Batteries
In the Box – X5
- – X5 Unit
- – Base with fixing screws
- – 4 x Adjustable Feet
- – 1 x Hand Sanitiser Container
- – 8 x C Type Batteries
Technical Specification
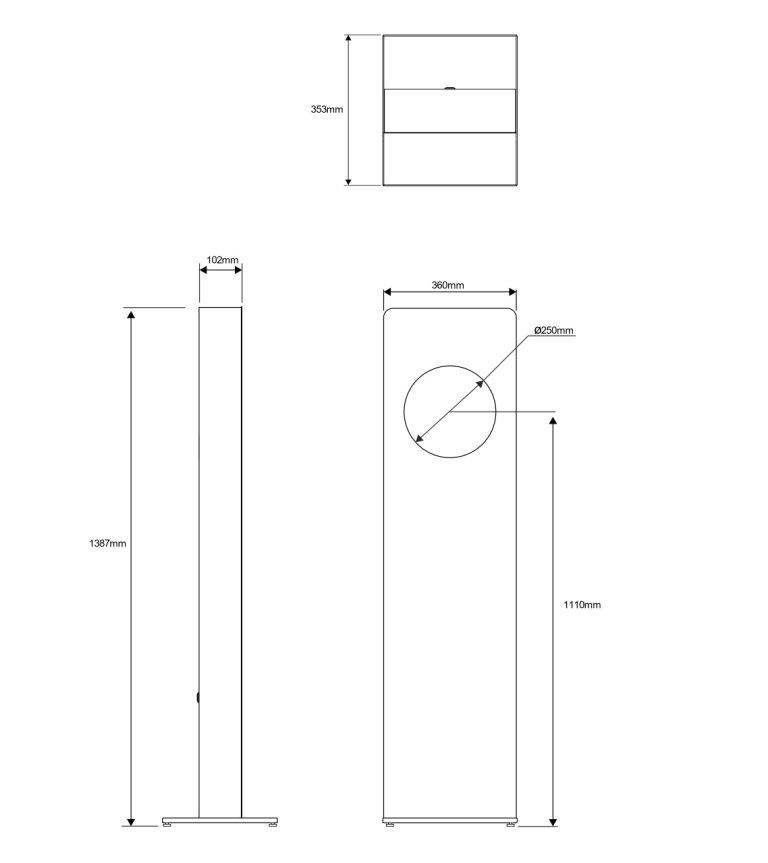
X4 Dimensions
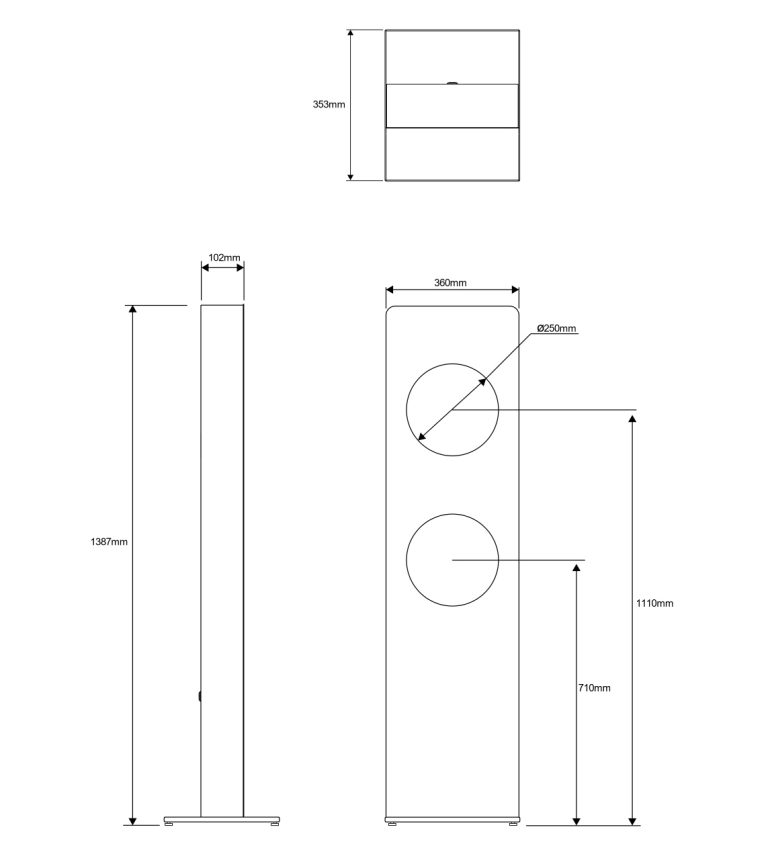
X5 Dimensions
X5 Electrical Diagram
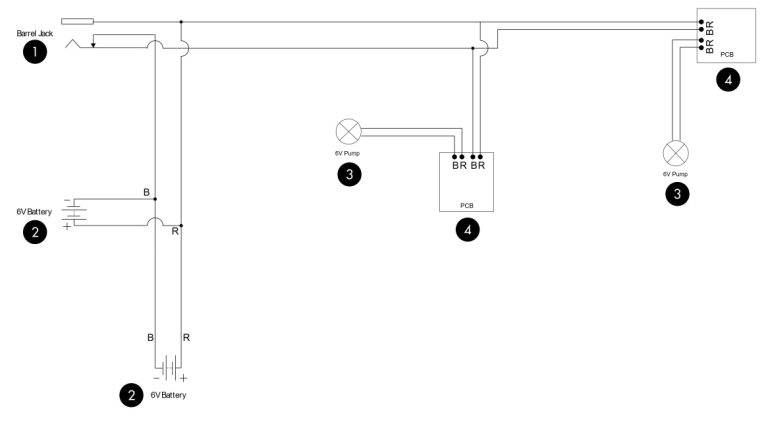
WIRE COLOUR LEGEND: R = Red, B = Black
KEY: 1 = Barrel Jack, 2 = 6V Battery, 3 = 6V Pump, 4 = Printed Circuit Board
X4 Electrical Diagram
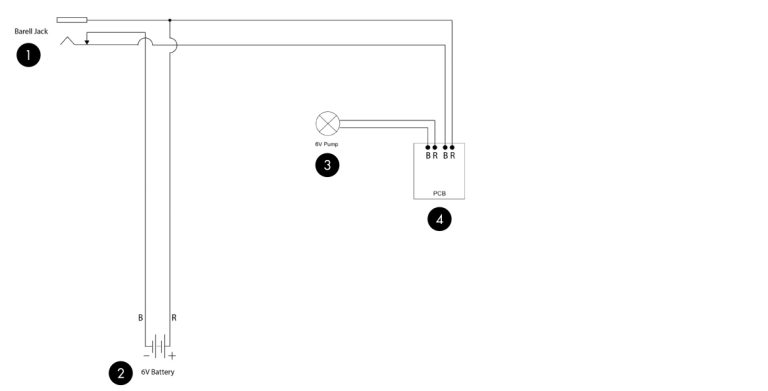
WIRE COLOUR LEGEND: R = Red, B = Black
KEY: 1 = Barrel Jack, 2 = 6V Battery, 3 = 6V Pump, 4 = Printed Circuit Board
Installation
Major Components
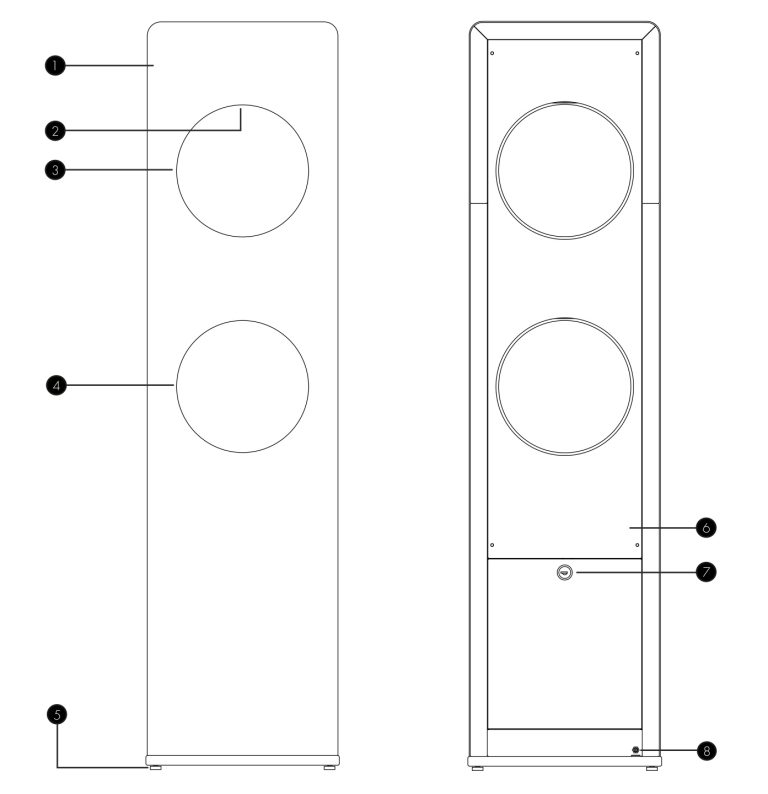
Note: Model shown is X5
Key: 1 = ACRYLIC PANEL, 2 = DISPENSE OUTLET, 3 = TOP APERTURE, 4 = LOWER APERTURE, 5 = ADJUSTABLE FEET, 6 = SERVICE PANEL, 7 = ACCESS PANEL LOCK, 8 = POWER JACK SOCKET
Before Installation
Before installation allow adequate space to install the appliance. Rear access is required to refill the unit or to change the batteries.
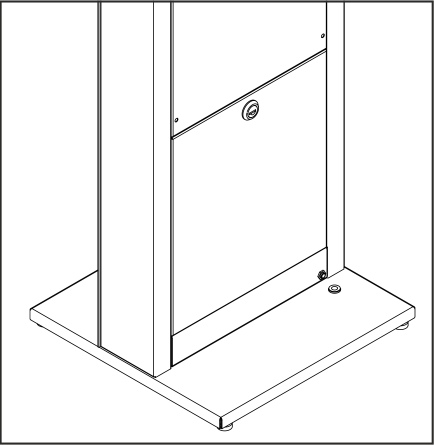
Mounting
Due to it being battery operated the X4/X5 is a free standing model designed to fit in any space. Where it requires to be mains powered ensure there is a nearby power socket.
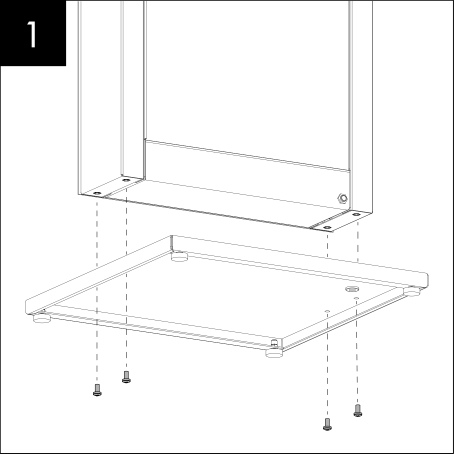
Lay down the cabinet on its side on a soft surface to avoid scratching. Fit the base to the underside of the unit and fix with the 4 screws provided. Note: Ensure the grommet is located to the rear of the unit.
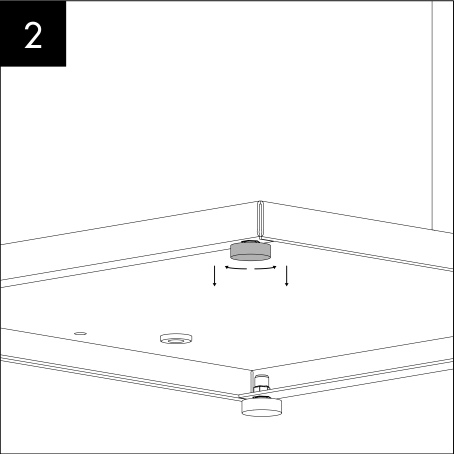
The cabinet can then be levelled using the 4 adjustable feet on the underside of the base.
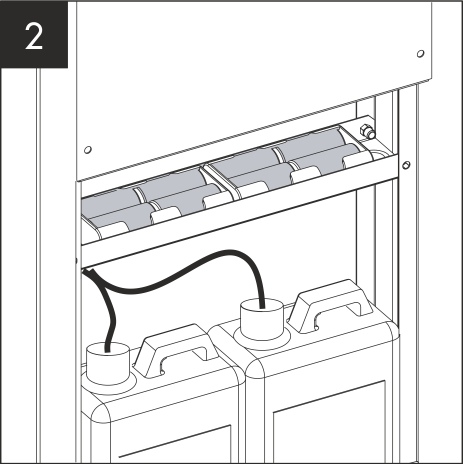
Commissioning


NOTE: PLEASE REFER TO BATTERY OPERATION FOR FULL INFORMATION.
For first time use it is required to prime the pump so the sanitiser gel is close to the outlet. To do this, repeatedly place your hands under the sensor until the unit starts to dispense the sanitiser gel.
The unit is now ready for use.
User Instructions
Operation
The X4/X5 is a touchless operation unit.
To operate you simply place your hands through the centre of either the top or bottom aperture to dispense the hand sanitiser. A blue LED indicator will light up when in operation.
Function and Controls
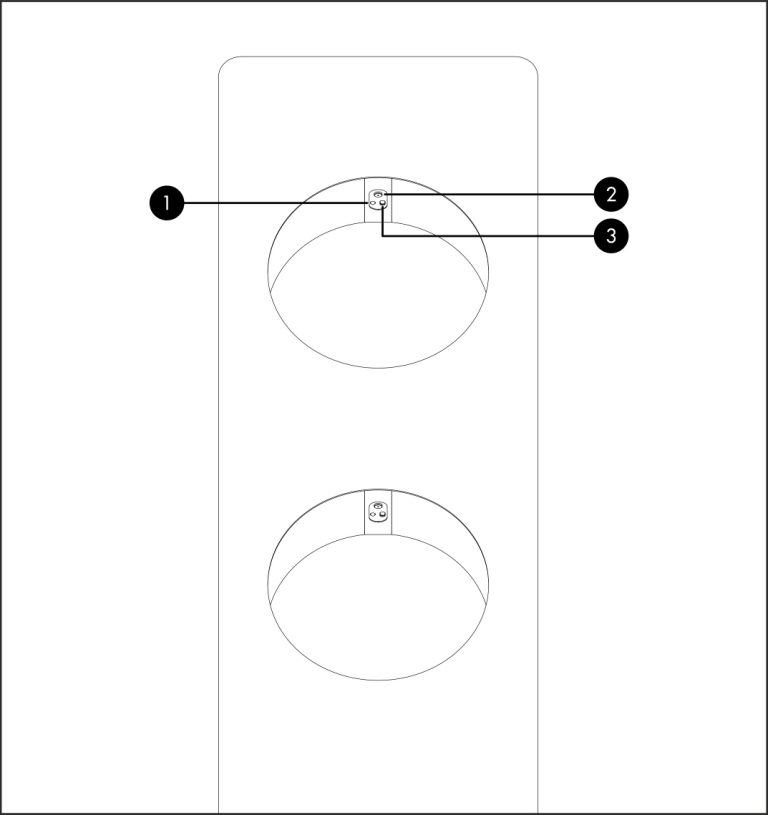
1 = Blue LED Indicator, 2 = Dispense Outlet Sensor, 3 = Sensor
Maintenance
Refilling the X4 X5 Unit
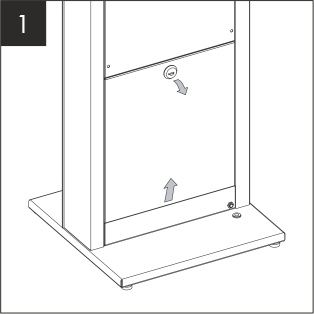
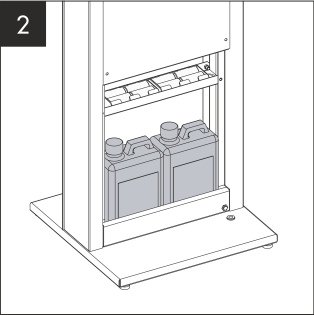
The X4 X5 has been designed so it can be quickly and easily refilled. To do so please follow the below instructions.


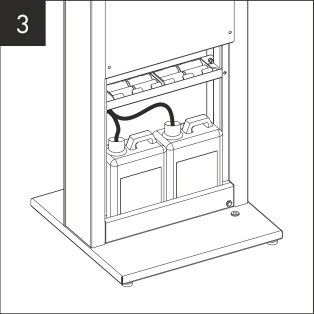
Replacing the batteries
- If the pump or LED starts to stutter or stop this is signs that the batteries may need replacing.
- If the unit is not to be used for any extended period of time it is recommended that the batteries are removed from the unit.
Caution: Replace batteries only with the same or equivalent type. Danger of explosion if the batteries are incorrectly replaced.
Correct disposal of the batteries in this product
(Applicable in countries with separate collection systems)
This marking on battery, manual or packaging indicates that the batteries in this product should not be disposed of with other household waste at the end of their working life. If batteries are not properly disposed of, these substances can cause harm to human health or the environment.
To protect natural resources and to promote material reuse, please separate batteries from other types of waste and recycle them through your local, free battery return system.

Silicone Hose and Outlet
If left for a sustained period of time the hand sanitiser gel can start to congeal in the hoses and around the stainless steel outlet. Regular cleaning of these components will help improve performance. To do this simply disconnect the hoses and clean through with warm water. The outlet can be easily cleaned in situ.
Care and Maintenance of Stainless Steel
Introduction
All grades of stainless steel will stain and discolour due to surface deposits and can never be accepted as completely maintenance free. In order to achieve maximum corrosion resistance the surface of the stainless steel must be kept clean. Provided the grade of stainless steel and the surface finish are correctly selected, and cleaning schedules carried out on a regular basis, good performance and long service life are assured.
Factors Affecting Maintenance
Surface contamination and the formation of deposits must be prevented. These deposits may be minute particles of iron or rust from other sources used on the building of new premises and not removed until after the stainless steel items have been fixed. Industrial and even naturally occurring atmospheric conditions can produce deposits which can be equally corrosive, e.g. salt deposits from marine conditions.
The working environment also offers more aggressive conditions e.g. hot humidity, such as in a swimming pool, increases the speed of discolouration and therefore requires the maintenance to be on a more frequent basis. Modern processes use many cleaners, sterilizers and bleaches for hygienic purposes. All these proprietary solutions, when used in accordance with makers instructions are safe but if used incorrectly (e.g. warm or concentrated) can cause discolouration and corrosion on the surface of any quality of stainless steel. Strong acid solutions are sometimes used to clean masonry and tiling of buildings, but they should never be permitted
to come into contact with metals, including stainless steel. If this should happen the acid solution must be removed immediately and copious applications of water.
Maintenance Programme
With care taken during fabrication and installation, cleaning before handling over to the Client should present no special problems, although more attention than normal may be required if the installation period has been prolonged. Where surface contamination is suspected, immediate attention to cleaning after site fixing will encourage a trouble-free product. Food handling, pharmaceutical, aerospace and certain nuclear applications require extremely high levels of cleanliness applicable to each industry.
Advice is often sought concerning the frequency of cleaning stainless steel and the answer is quite simple “clean the metal when it is dirty in order to restore its original appearance”. This may vary from once to four times a year for external applications or it may be once a day for an item in hygienic or aggressive situations. Frequency and cost of cleaning is lower with stainless steel than with many other materials and will often outweigh the initial higher cost of this superior product.
| PROBLEM | CLEANING AGENT | COMMENTS |
|---|---|---|
| Routine cleaning | Soap or mild detergent and water (Such as Fairy Liquid). | Sponge, rinse with clean water, wipe dry if necessary. |
| Fingerprints | Soap or warm water or organic solvent (e.g. Usher/ Walker Thinners No PF8017, acetone, alcohol). | Rinse with clean water, wipe dry if necessary. |
| Stubborn stains and discolouration | Mild cleaning solutions i.e Jiff, Goddard Stainless Steel Care. | Rinse well with clean water, wipe dry if necessary. |
| Rust and other corrosion products. | Oxalic Acid. The cleaning solution should be applied with a swab and allowed to stand for 15-20 minutes before being washed away with water. May continue using Jiff to give final clean. | Rinse well with clean water. (precautions for acid cleaners should be observed). |
| Scratches on surface | Slight scratches. Impregnated nylon pads. Polishing with scuffs dressed with iron free abrasives. For deeper scratches; apply in direction of polishing. Then clean with soap or detergent as per routine cleaning. | Do not use ordinary steel wool - iron particles can become embedded in stainless steel and cause further surface problems. |
Precautions
Acids should only be used for on-site cleaning when all other methods have been proved unsatisfactory. Rubber gloves should be used and care taken to see that acid cleaners are not spilt over adjacent areas. Special precautions are necessary with oxalic acid. Solvents should not be used in closed places. Smoking must be avoided when using solvents.
Fault Finding
| Problem/Report | Possible Cause | Suggested Action |
|---|---|---|
| No sanitiser dispenses | Sanitiser container empty | Check and refill sanitiser container. |
| Pump not working | Check probes connected/ Leads attached. Check power supply to pump. | |
| No electricity/power supply | Check batteries and replace if necessary. Check power cord is connected and live. | |
| Blocked outlets/pipes | Check and unblock or replace as needed. | |
| Sensor PCB not working | Check/replace control PCB | |
| Sanitiser lying in machine | Leak from outlet | Locate and repair accordingly |
| Faulty sensor | Locate and repair accordingly |
If you need further assistance, please contact our technical support team.
Spares
Parts Diagrams
Spares List
| Sterizen Part No | Description |
|---|---|
| 700614 | 6V Pump with Connector Joints |
| 700693 | Stainless Steel Outlet |
| 700820 | Outlet Locking Nut |
| 700859 | Control Board with Sensor and LED |
| 700840 | PCB Mounting Supports |
| 700885 | Emka Lock and Cam |
| 700729 | Rear Access Door |
| 700842 | Adjustable Feet x 4 |
| 700652 | Base Plate |
| 700830 | Silicone Hose |
| Sterizen Part No | Description |
|---|---|
| 500679 | 1L Refill Container - Mighty Mint |
| 500680 | 1L Refill Container - Energy Rush |
| 500681 | 1L Refill Container - Citrus Zest |
| 500682 | 1L Refill Container - Magenta Sky |
| 700928 | AC Mains Adapter |
| 700899 | Floor Fixing Kit |